Paint Can Cubbies
Photo Source: Martha Stewart
Don't let your desktop disappear under piles of paperwork. Inexpensive, unused cans can be purchased at paint stores; lined up on a shelf and anchored in place with Velcro, they become organizing cubbyholes with a modern flair. Assign cans as storage spaces for bills, catalogs, and personal mail, or one for each member of the family. Label the shelf beneath to make sorting easy.
Cloth Covered Storage Boxes
Photo Source: Martha Stewart
Storage boxes are essential in offices, but that doesn't mean they have to be dull! Use a little creativity to add a splash of color to your basic boxes. Cut a plus-sign shape out of book cloth, measuring fabric so each side panel covers box with an extra 1/2 inch on both sides and 2 inches on end. (Get the template.) Spread paste on center cloth panel; set box on top. Spread paste on side panels, and cover box, folding excess cloth over top edge, around corners, or under itself to hide seams. Hold in place with clothespins; let dry overnight. Cover lids if desired. And remember, you don't have to limit yourself to fabric - wallpaper and sturdy wrapping paper are also excellent solutions.
Shared Office Space Strategies
Photo Source: Martha Stewart
It can be a challenge to create a desk that's roomy enough for one person, let alone two. This symmetrical setup is the perfect solution, unifying a pair of workstations in an open configuration that fits snugly against almost any stretch of wall without overwhelming the rest of the room.
Kitchen cabinets hung overhead are put to creative use, eliminating the need for bulky file cabinets and providing instant access to documents and miscellaneous items. With a simple design that fits seamlessly into this (or any) contemporary decor, they also provide discreet storage.
Photo Source: Martha Stewart
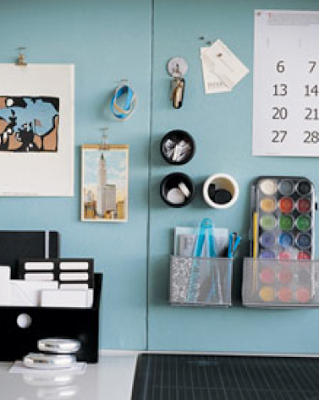
A functional backdrop crafted from alternating panels of bulletin and magnetic board is covered in unifying swaths of aqua linen. (An alternative to a magnetic board could be cork board squares covered with fabric.) The vivid fabric conceals the different materials and stands out from the room's graphic black-and-white color scheme.
Photo Source: Martha Stewart
Magnetic hooks, caddies, and tins provide hanging storage for small items. Many varieties of caddies and hooks are available at local office supply stores.
Framed Bulletin Board
Photo Source: Martha Stewart
A hardworking bulletin board is, quite literally, pretty as a picture when covered with cheerful fabric, then placed in a frame and hung from a wide ribbon. The frame is painted to complement the fabric, which makes a perfect background for favorite photographs and letters, along with the more prosaic matters of life such as the phone bill and the grocery list. Have a lumber yard cut 3/4-inch-thick Homasote fiberboard to fit a large frame. Cut a piece of fabric 2 inches larger all around; place facedown on work surface. Center fiberboard over fabric. Wrap one side of fabric to the back. Using a staple gun, attach fabric to board, beginning with one staple in the middle of the side, 1 1/2 inches in from the edge. Wrap fabric over opposite side, and secure to board with a staple directly opposite the first. Repeat with other two sides. Continue stapling fabric, working out toward the corners, always adding staples in pairs on opposite sides of the board, ensuring fabric stretches evenly. Place board in frame; secure in place with angle brackets at each corner. Attach D-rings to back of top corners of the frame. Loop ribbon through D-rings, and hang.
Office Wire Organizer
Photo Source: Martha Stewart
Eliminate tangles under your work area by feeding all cords through a hole drilled in the desktop. Then plug the wires into a power-surge protector strip, which is mounted on the underside of the desk. Keep cords in a coated wire basket (available at housewares stores) suspended under the desk with wire hooks. Tags identify where each machine wire comes from.
Wallpaper Shelves
Photo Source: Martha Stewart
Add a splash of personality to a lackluster work space by covering plain floating bookshelves with wallpaper. Measure the shelf, and cut the wallpaper slightly longer than shelf and wide enough to wrap around it with an overlap. Use wallpaper paste to affix the wallpaper to the shelf, pasting one side at a time. Cut slits into excess paper at ends, forming flaps; fold down, and affix with paste. Let dry completely, and hang shelves as usual.
Clipboard Artistry
Photo Source: Martha Stewart
Use decorative paper (or wallpaper leftovers or samples) to brighten basic clipboards.
Start by making a template: Trace the shape of the board onto card stock, making a notch for the clamp (use a zip tie to hold clamp open while working). Place template on the back of paper; cut out with a craft knife. Brush a thin, even layer of decoupage glue onto clipboard with a craft brush. Affix paper, and smooth out air bubbles with a craft scraper. Brush with decoupage glue. Hang several in place of a bulletin board.
Personalized Tins and Paperweights
Photo Source: Martha Stewart
Brighten your desktop by slipping a picture of a familiar face into the lid of a round tin. Here, a black-and-white photograph was added to a small metal tin with a glass lid (available at crafts stores in assorted sizes). It can hold pins, paper clips, and the like. Or fill it with pebbles, and use it as a paperweight. Round tins can also function as magnets.
To make the tins, print black-and-white photos onto ink-jet paper. Center lid on photo, and trace with pencil. Using scissors, cut along the inside of the traced line. Place photo in lid, and tape it to the lid's inner rim. To magnetize, glue a magnet to the bottom of an empty container, and stick to a metal surface
Let us know how you got crafty this weekend! Post all your creative endeavors on our Facebook: http://www.facebook.com/JenniferRiceAndTeam


No comments:
Post a Comment